How to Draw a 3D Cube!

Hey friends!

In this drawing lesson I’ll teach you a high demanded topic – how to draw a 3d cube!

Now, there are a lot of different videos / lessons on drawing a cube.

But…

I want to put an emphasis on UNDERSTANDING how a cube looks from all angles, which will allow you to draw it in ANY angle you would like.

Sounds awesome? That’s because it is.

First – watch the vid. Than, read on for the key tips.

Okay, got it?! Now for the main points:
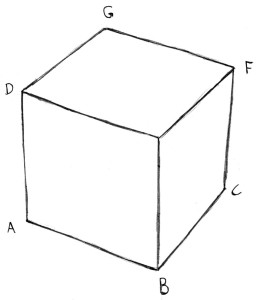
What is a Cube?

A cube is a three-dimensional object that has 6 equally sized sides. It also has 8 pointy angles.

Here is a transparent cube depicting this.

How to draw a 3d cube

In reality, we can only see up to  3 planes of the cube.

Here is how it looks.

How to draw a 3d cube

Different Angles

If we move the cube around, we will see less of certain sides and more of others.

This happens because when we look at things from an angle, they become squeezed. That’s called foreshortening, and will be covered in a separate post (=

Anyway, here are some cubes at different angles.

How to draw a 3d cube

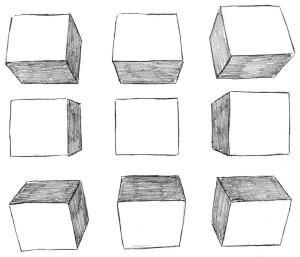
Notice how the in the center most cube – we can only see ONE side.

The ones above it are tilted upwards or downwards, and allow us to see TWO sides.

The rest are tilted both upwards / downwards, AND  sideways. This allows use to see THREE sides.

That’s how it works (=

Hopefully now you can draw a 3D cube at ANY angle you wish!

Hit me up with questions, or anything else you might have in mind, and I’ll do my best to help!

Also, be sure to SUBSCRIBE to my blog (ON THE LEFT), or via my Get Awesome Stuff page!

You’ll get my eBook for free + great tips and advice on drawing, delivered straight to you! (=

Until next time,

– Liron

How to Draw a 3D Ball

Hey friends!

In this drawing lesson I’ll teach you how to draw a 3D ball! Well actually it’s a beach ball… Let’s go!

Check out the video first, and then read on for extra drawing tips.

Key tips:

1. Draw an accurate shape

Shading is important, but remember that drawing an accurate shape to begin with is ALSO important.

Try and get the guidelines to be relatively accurate, and in place.

2. Set the light source – and stick to it!

This may be basic to some, but is important to take note of. Upon deciding on a light source, make sure you stay “loyal” to it.

If light comes from the right side, make sure all left / inner / indented parts are darker.

3. How to draw the shadows themselves

There are several factors that dictate how shadows look.

The key ones are:

  • Distance / direction of the light source
  • Strength of the light source
  • Distance of object from the surface on which the shadow falls

Here are a few simple examples:

Direction of the light source:

Direction

The stronger the light source, the darker the shadow:

Strength

The SMALLER the distance between the object and it’s cast shadow, the DARKER the cast shadow becomes.

Distance

Aaaaand that’s probably it for this drawing lesson! Hope you learned something new.

Also, be sure to SUBSCRIBE to my blog (ON THE LEFT), or via my Get Awesome Stuff page! You’ll get my eBook for free + great tips and advice on drawing! (=

I’ll talk to you soon,

– Liron

How to Draw a Pug Dog’s Face (Cute!)

Hey there!

In this drawing lesson I’ll teach you how to draw a cute pug face.

Key Drawing Tips

1. Draw a good base of guidelines.

Be sure to draw the guidelines correctly. They are the base of the drawing.

how to draw a pug face - guidelines

They don’t have to look perfect, and you can roughly sketch them. They do, however, need to be as accurate as possible.

Draw the main shape of the head and the ears. Finally, divide the face along the center. This will help us draw the rest of the face.

Pug eyes and nose

2. Fur Fur Fur

The fur is an important component to this drawing.

Use short, quick strokes of the pencil to draw the fur and make it look believable. Be sure to observe the direction in which the fur grows, and draw it according to that.

In this specific drawing, the fur moves outwards from the center of the cute pug’s face.

how to draw pug fur

And that’s mostly it!

Have fun, and draw many different animals so you can practice different types of textures, such as fur, scales, feathers etc…

Also, be sure to SUBSCRIBE to my blog (ON THE LEFT), or via my Get Awesome Stuff page! You’ll get my eBook for free + great tips and advice on drawing! (=

And until next time, take care!

– Liron

How to Draw a Shirt

Hey friends!

In this drawing lesson I teach you how to draw a shirt, step-by-step.

I put an emphasis on the folds and clothes that are created in the shirt.

Key points on how to draw a shirt:

1. Learn where folds are created in shirts.

Here is an infographic showing the main locations of folds, with some examples:

Shirts copy

The main areas are under the arms and near the waist. These are the areas in which there is excess cloth. This cloth tends to bunch up. That’s the way folds are created (=

2. Learn where the shadows go.

I haven’t gotten into shading in this specific example. But – shading is crucial for making the folds POP and look good.

Set up a light source, and then draw the shadows accordingly.

I’ll definitely publish a conclusive video on shading in the not-so-far-away future.

Anyway, that’s the most important things to take from this. hope you enjoyed the lesson, and learned how to draw a shirt yourself.

Be sure to SUBSCRIBE to my blog (ON THE LEFT), or via my Get Awesome Stuff page! You’ll get my eBook for free + great tips and advice on drawing! (=

And I’ll talk to you soon,

– Liron